On this page
- Step 1: Get your content out of WordPress
- Step 2: Create the vagejs site
- Step 3: Turn each post into a Markdown file
- Step 4: Keep your old addresses
- Step 5: Let the check find what didn't survive
- Step 6: Categories, feeds and images
- What stays behind in WordPress
- The WordPress move, recapped
- Switching your domain over
WordPress is a capable, flexible platform, and for plenty of sites it's the right one. But some blogs are simply a few dozen posts, an about page and a contact link, and their owners would rather not run a database and a plugin stack to serve them. If that's you, this walkthrough moves the blog to vagejs without losing your posts, your images or the addresses people have linked to over the years.
We'll be honest about the gaps as we go. vagejs 0.3.0 has no WordPress importer, so part of this is careful copying. Every vagejs command and config snippet below was run on 0.3.0 in a test project, and the output is real.
If you're still deciding, our vagejs vs WordPress comparison covers what each one is good at.
Step 1: Get your content out of WordPress
WordPress has a built-in export. Under Tools → Export in the dashboard, you can download one file with your posts, pages, comments, categories, tags and more. WordPress documents it on its Tools Export screen page. The file is XML in a format WordPress calls WXR.
Your images are separate. WordPress keeps uploads in a folder on your server, wp-content/uploads by default, and can sort them into year and month folders, as its Media settings page explains. Download that whole folder with your host's file manager or an FTP client.
Before you go further, write down two things from your WordPress settings:
- Your permalink structure. WordPress offers several, from "Post name" (
/sample-post) to "Month and name" (/2008/03/sample-post/), listed on its Permalinks screen page. You'll want to keep these addresses working. - Your feed address. Find the RSS link on your current site. Subscribers' feed readers know that address, and we'll point it at the new feed.
Step 2: Create the vagejs site
You'll need Node.js 22.12 or newer:
npm create vagejs@latest my-blog
cd my-blog
npm install
Open vage.config.ts and set your real address, title and description. The site value matters: canonical URLs, the sitemap and the feed are all built from it.
Step 3: Turn each post into a Markdown file
This is the part vagejs doesn't do for you. Each post becomes one Markdown file with a small header of settings (frontmatter) on top:
---
title: Spring on the harbour
description: A morning walk along the harbour wall, the first boats back in the water, and where to get coffee before nine.
type: article
author: Sam Rivera
datePublished: 2024-03-18
---
# Spring on the harbour
The first boats went back in the water this week.
Keep the real publish date and the real author from the export. type: article gives the post Article structured data for search engines.
How you get from XML to files depends on the size of the blog:
- A handful of posts: copy and paste. Honestly, for twenty posts it's an afternoon, and you'll tidy things as you go.
- Hundreds of posts: use a script or a conversion tool, then review the results.
- An AI coding agent: give it the export file and ask it to write one Markdown file per published post in
src/pages/blog/, keeping titles, dates and authors exactly as they are. Every vagejs site ships with anAGENTS.mdthat tells the agent the frontmatter rules. Then check its work with the next step, because agents make mistakes too. Our agent guides have setup notes for each tool.
Step 4: Keep your old addresses
Search engines and other websites know your posts by their old URLs. There are two good ways to keep them working.
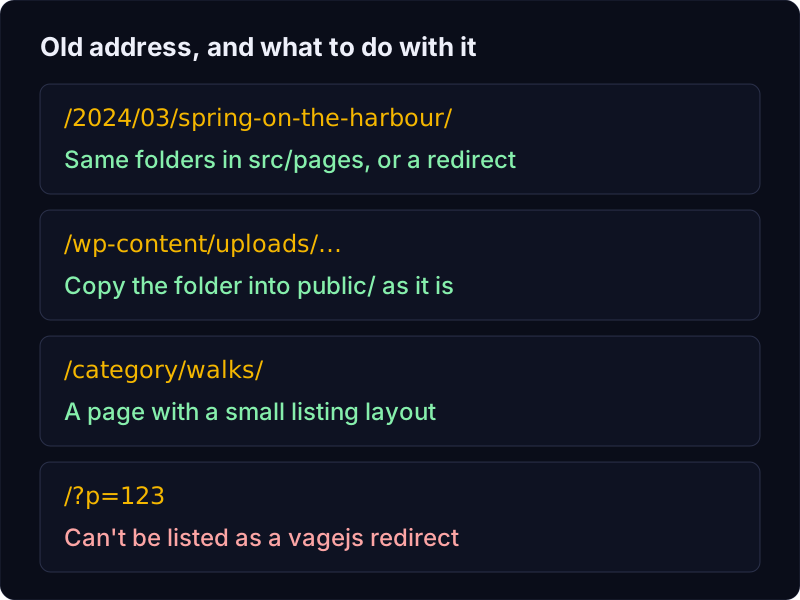
Option A: keep the same addresses. In vagejs, a file's path is its address. If your permalinks were "Month and name", put the post at src/pages/2024/03/spring-on-the-harbour.md and it's served at /2024/03/spring-on-the-harbour/, exactly as before. No redirects needed.
Option B: move posts under /blog/ and redirect. Put the file at src/pages/blog/spring-on-the-harbour.md and add the old address to vage.config.ts:
redirects: {
  "/2024/03/spring-on-the-harbour/": "/blog/spring-on-the-harbour/",
},
On every host, the build writes a small page at the old address that sends visitors on and is marked noindex. If you deploy to Cloudflare (deploy: { target: "cloudflare-workers" }), vagejs also writes a _redirects file, and Cloudflare answers with a real 301. From our build:
/2024/03/spring-on-the-harbour/ /blog/spring-on-the-harbour/ 301
/2024/03/spring-on-the-harbour /blog/spring-on-the-harbour/ 301
One limit to know: vagejs redirects match paths, not query strings. If your site used WordPress's "Plain" links (/?p=123), those can't be listed as vagejs redirects. We tried: vage check stops with an error, because it reads /?p=12 as the home page's own address.
For images, the trick is simple: copy the downloaded wp-content/uploads folder into public/, keeping the folder names. public/wp-content/uploads/2024/03/harbour.jpg is served at /wp-content/uploads/2024/03/harbour.jpg, so every image link in your posts still works without editing.
Step 5: Let the check find what didn't survive
WordPress posts carry things that don't belong in a Markdown site: embedded videos, inline styles, shortcodes from plugins, and links to sites you forgot about. Run the check:
npx vage checkOn our test post, it said:
warning config                 site
        "site" is still the placeholder https://example.com; canonical URLs and sitemap.xml will point there. Set your real origin.
warning jsonld-article         /2024/03/spring-on-the-harbour/ (src/pages/2024/03/spring-on-the-harbour.md)
        Article JSON-LD lacks properties Google recommends: image. Add them to the frontmatter only if they are true.
        see https://developers.google.com/search/docs/appearance/structured-data/article
error   link-unapproved        /2024/03/spring-on-the-harbour/ (src/pages/2024/03/spring-on-the-harbour.md)
        Links to tidesandcurrents.example.net (on /2024/03/spring-on-the-harbour/) aren't approved in links.lock.json. If the site owner added them on purpose, they approve with "npx vage links approve tidesandcurrents.example.net". Otherwise remove them: unapproved links are how injected spam usually shows up.

Checked 6 page(s): 1 error(s), 2 warning(s).
Passing checks do not guarantee indexing, rankings, rich results or AI citations.
The link-unapproved error is vagejs's spam protection. Every site may only link to domains listed in links.lock.json, so an injected spam link can't slip through. An imported blog will link to many sites, so list them all first:
npx vage linksNEW tidesandcurrents.example.net 1 page(s): /2024/03/spring-on-the-harbour/Go through the list, remove links you no longer want, and approve the rest yourself with npx vage links approve <domain>. It's tedious for a big blog, but it's also a good moment to catch dead links to sites that no longer exist. Security explains the lock.
Some problems the check won't flag, because vagejs quietly removes them while building. Page content is sanitized: scripts, iframes, forms and style attributes are removed. In our test, a pasted YouTube <iframe> and the style on a paragraph simply vanished from the built page, and a [gallery ids="12,13,14"] shortcode came out as plain text, because nothing in vagejs understands it. Search your files for [ shortcodes and <iframe before you publish. Video embeds belong in a layout, which is trusted code.
Step 6: Categories, feeds and images
Categories. vagejs has no automatic category or tag archives. You can make one page per category with a small layout. Add category: walks to each post's frontmatter, create src/layouts/category.ts:
import { collection, html, raw, type Layout } from "vagejs";
import defaultLayout from "./default.ts";

// A category page lists the blog posts whose `category` matches its own.
const layout: Layout = (props) => {
  const posts = collection(props.pages, { under: "/blog/", sort: "date" })
    .filter((p) => p.frontmatter.category === props.page.frontmatter.category);
  const list = html`<ul>${posts.map((p) => html`<li><a href="${p.route}">${p.title}</a></li>`)}</ul>`;
  return defaultLayout({ ...props, content: String(html`${raw(props.content)}${list}`) });
};

export default layout;
Then a page at src/pages/category/walks.md with layout: category and category: walks in its frontmatter. If your old category pages lived at /category/walks/, that's the same address.
The feed. Add seo: { feeds: [{ under: "/blog/" }] } to the config and vagejs writes /blog/feed.xml, newest posts first. Then redirect your old feed address to it, for example "/feed/": "/blog/feed.xml". A real 301 (on Cloudflare) is what feed readers follow; the fallback redirect page is meant for browsers, so on other hosts check that your readers follow it.
Images. Turn on images: { optimize: true } and install sharp (npm install --save-dev sharp). vagejs then makes resized WebP copies of images in your posts and offers them with srcset, so phones download a smaller file. Every content image stored in public/ also gets its width and height written in, so the page doesn't jump while loading.
What stays behind in WordPress
Being clear about this saves surprises later:
- Comments. vagejs builds static pages and has no comment system. Existing comments are in your export; you could keep the best ones as text in the post.
- Plugins. There's no plugin directory. Forms, shops and memberships need another service, linked from your site.
- The dashboard. There's no online dashboard. You edit Markdown files, or use vagejs's local editor on your own computer: forms for each page and a live preview. For many people that's the point; for some it's a dealbreaker.
- Search, related posts and the like are layout code you'd write (or ask an agent to write), not switches you flip.
The WordPress move, recapped
- Export with Tools → Export, and download
wp-content/uploadsseparately. - One Markdown file per post, with the real title, date and author in frontmatter.
- Keep old addresses with matching folders, or redirect them; query-string links can't be redirected.
- Copy
wp-content/uploadsintopublic/so image links keep working. - Let
npx vage checkandnpx vage linksfind broken and unexpected links, then search for shortcodes and iframes yourself. - You give up comments, plugins and the online dashboard. You gain plain files, no database and nothing to patch on a server.
Switching your domain over
When npx vage check reports 0 errors and npm run build succeeds, deploy to a test address first and click around. npx vage deploy:github --dry-run shows exactly what would be committed before anything is pushed, and the deployment guide covers GitHub Pages and Cloudflare. Only then point your domain at the new site, and keep the old WordPress install (and a full backup) until you're sure nothing is missing.
Start with getting started, and move a few posts before you move them all.